
![]()
Help Center
Welcome to the Head Chatter Help Center. Get quick answers to your questions and learn how to use Head Chatter features. Need more help? Contact us here.
Select a Main Help Topic
Sign-In & Passwords
- Forgot Your Password?
- Change Your Password
- Sign-In
- Sign-In Menu
- Your Profile
- Your Profile Photo
- Your Destinations
- Sign Out
Your Username
Your Profile
Membership Billing
- Membership Credit Card/ACH Processor
- Cancel Your Account & Billing
- Credit Card/ACH Failed to Renew
- Change Your Billing Method
- Update Your Expired Credit Card Information
- Cost of Membership
Suggest a Destination
Feedback
Destination - Access
Destination – Right Panel
- Controls – Menu
- Search Conversations
- Share Destinations on Social Media
- Recent Visitors
- Media Tab
- Links Tab
- View More Button
- Load More Button
- Hide and Show Right Panel
- Notifications
- Right Panel Scroll Bar
Destination – Center Chat Window
- Destination ID & Hashtag
- Hide and Show Left Panel
- Top Drop-down Menu - Mute Sounds
- Top Drop-down Menu - Report Problem
- Top Drop-down Menu - Clear Posts
- Top Drop-down Menu - Unjoin Destination
- Top Drop-down Menu - Hide/Show Right Panel
- Member Posts - Reply to a Member’s Post
- Member posts - Report a Member’s Post
- Member Posts - React to a Member’s Post
- Direct Messenger - Member-to-Member
- Report a Problem
- Menu Controls for Your Posts
- Delete Your Post
- Reply to Your Post
Destination Controls – Left Panel
- Home Page Link
- My Destinations – Your Destination List
- Room Tab
- DM Tab – Direct Messenger
- Fav Tab – Favorite Members
- Search for Member in Chat
- View a Member’s Profile
- Your Account Menu
- Your Online Status
- Your Profile
- Destination Description
- My Destination List
- Help Center
- About Us
- Contact Us
- Community Guidelines
- Privacy Policy
- Terms of Service
- Sign Out
Custom Destinations for Your Business
StoreFront • OfficeFront • ServiceFront
-
Step 1:
- Create Your Business Membership Account
- Add Your Business Membership Profile Photo
- Add Your Business Membership Profile Information
- Provide Us with Details, Information, and Content for your Business Destination.
- Make Business Changes
Step 2:
By Request Destinations
Home Page
- Sign-In
- Forgot Your Password?
- Sign-In Menu
- Your Profile – Individual Memberships
- Your Profile Photo – Individual Memberships
- Your Personal Information – Individual Memberships
- StoreFront, OfficeFront, or Service Front Business Memberships
- Your Business Profile Photo – Business Memberships
- Your Business Information – Business Memberships
- My Destinations
- Sign Out
- Search Destinations Bar
- Search Destinations by Community, By Request and by Business Name or Type
Sign-In & Passwords
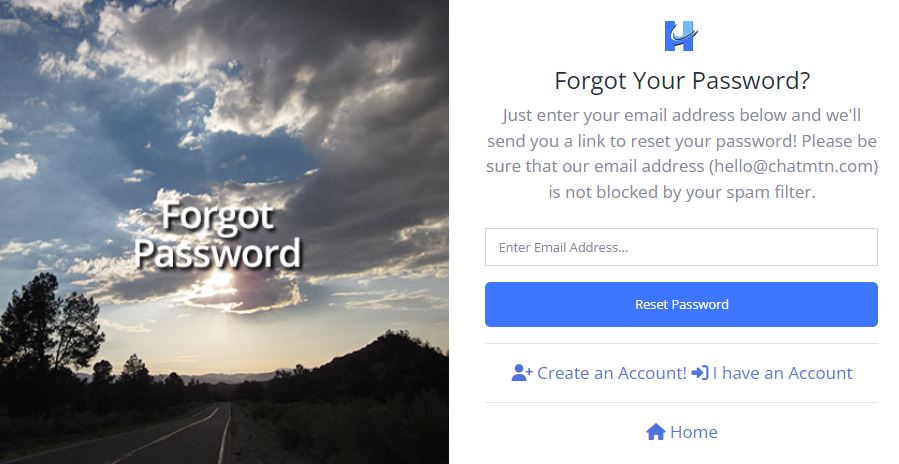
Forgot Password
- Click the “Sign In” Button on the Home Page
- Click the “Forgot Password?” Link on the Sign-In Panel
- Enter the Email Address that you used to create your Account
- Click the “Rest Password” Button
- Check your Email for a Password Reset Link
- Click the “Reset Password” Button in the Email
- Enter Your New Password and Click the “Reset Password” Button
- Click the “Sign-In” link to sign into your Account using your New Password
Note: The email address you enter to reset your password must match the email address you used to create your account.
SPAM Controls: If you don’t see the “Password Reset” email we sent to you within a few minutes, please check your junk/spam folder.
Having Trouble? If you encounter Sign-In problems or have trouble resetting your password, contact us for help by clicking the “Contact Us” link Here.
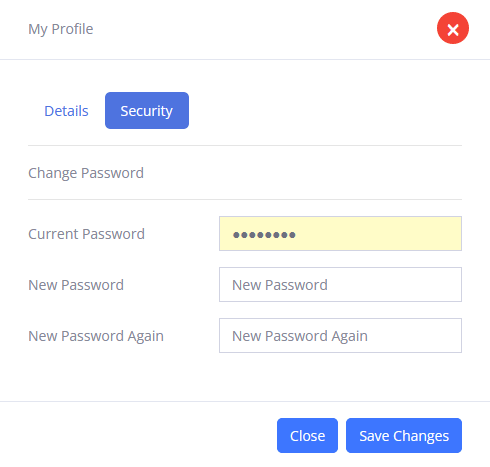
Change Your Password
- Enter any Destination.
- Click your “Username” at the bottom portion of the Left Destination Panel to open your Account Menu.
- Click “My Profile” and Click “Security” to create a new password.
- Enter a New Password and Click “Save Changes”.
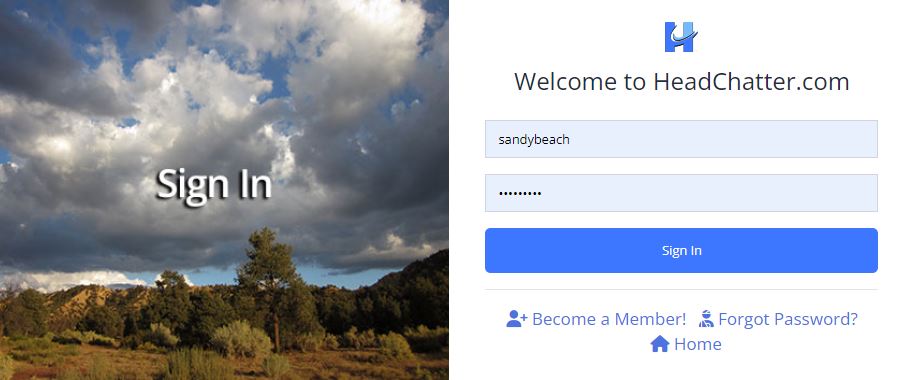
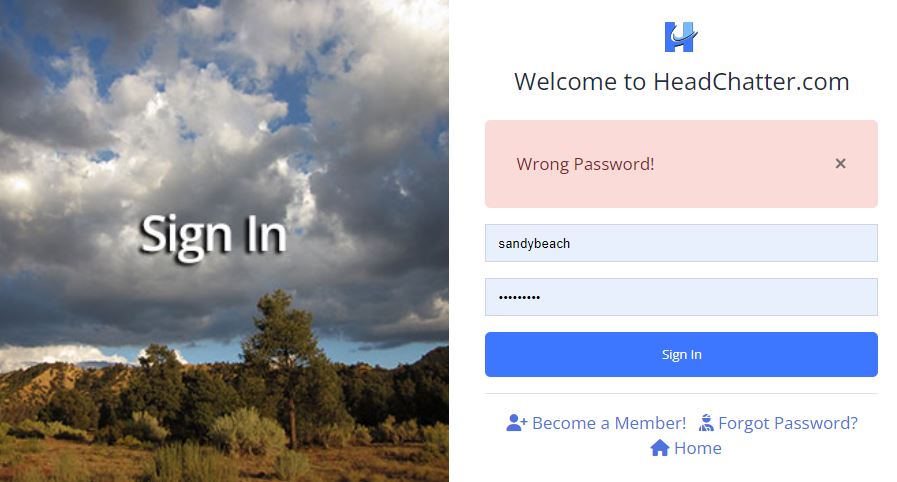
Sign In
- Click the “Sign In” button located on the Home page.
- Enter your Username and Password and Click “Sign In”.
Sign-In Menu
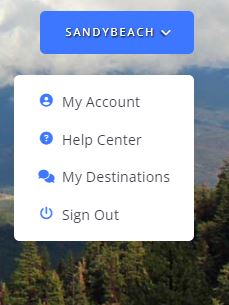
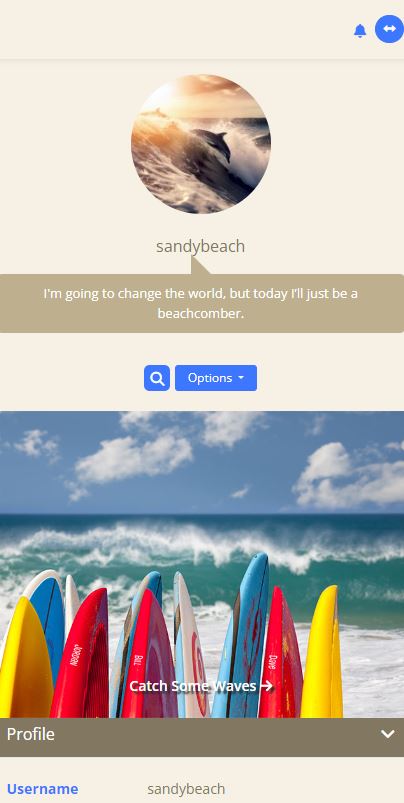
Your Profile
You have the option to upload a photo or image to your profile and provide information about yourself or leave parts of your profile blank.
It’s important to observe the following guidelines if you decide to upload a photo, icon, or image to your profile or provide any personal information.
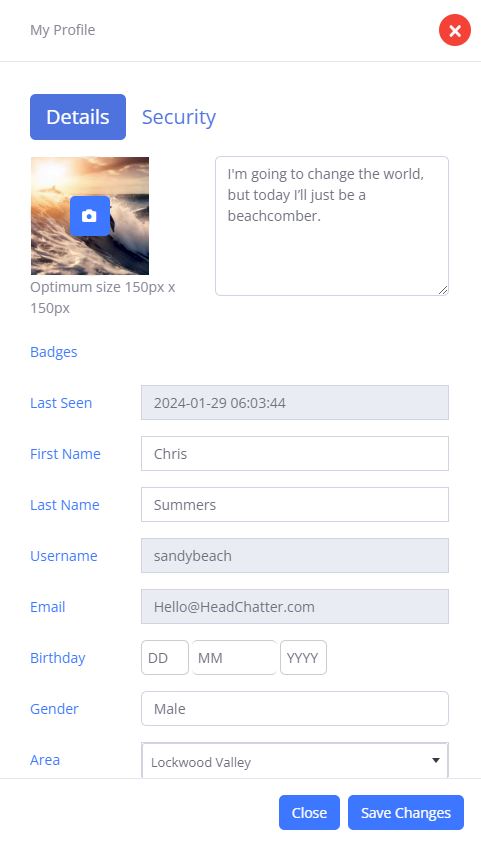
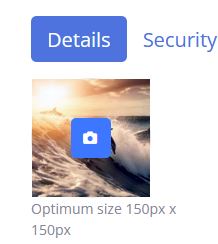
Your Profile Photo
Your profile photo can be of you or any image as long as it is not an image of a sexual nature, violent, intentionally offensive, copyright protected, or obscene and meets our Community Guidelines.
Your Profile Photo or Image must be in .JPG format.
Important: Please Do Not Use Animated GIFS or Flashing or Moving Images in your profile or anywhere on the Service. Flashing images can cause some people headaches, photosensitive epilepsy, PSE or reflex epilepsy.
- Click the Camera Icon to search for an Image on your computer.
- Search for an Image to use for your Profile Photo.
- Click on the Image you want to Upload to your Profile. It will be highlighted.
- Click the “OPEN” button located in the bottom right-hand corner of your File Window. (PC) The Image will upload to your Profile. The File Window will close. You can also follow this step to change your Profile Photo Image.
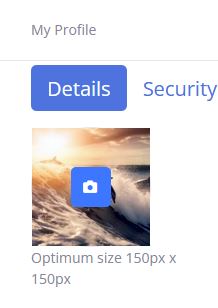
Your Personal Information – Individual Memberships
For your security and privacy, we recommend that you do not include phone numbers, street or mailing addresses, URLs, email addresses or any other personal contact information in your profile or in any publicly viewable areas on the Service.
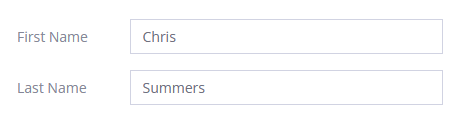
- Your First Name and Last Name are NOT VISIBLE to Members.
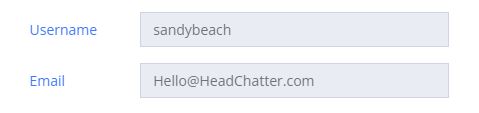
- Your Username IS VISIBLE to Members.
- Your Email Address is NOT VISIBLE to Members.
- Your Birthday IS VISIBLE to Members. You can provide the date or leave it blank.
- Your Gender IS VISIBLE to Members if you provided your Gender when you created your account.
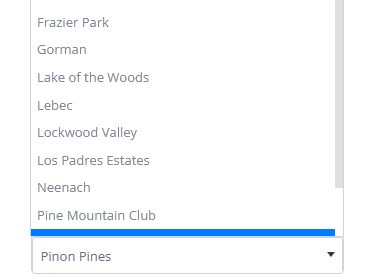
- The Area you choose IS VISIBLE to Members.
Your Business Information - StoreFront, OfficeFront, and Service Front Business Memberships
If you own a business and would like to make it part of the Head Chatter Community, find out how you can Grow Your Business with a custom StoreFront, OfficeFront, or ServiceFront here.
Important: Business Memberships cannot be used to enter or talk in Member Destinations since business advertising and promotion of any kind is prohibited by members in Member Destinations.
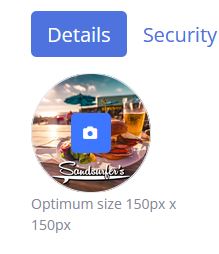
Your Business Profile Photo
Your Business Profile photo can be of you, your logo, or any image as long as it is not an image of a sexual nature, violent, intentionally offensive, copyright protected, or obscene and meets our Community Guidelines.
Your Business Profile Photo or Image must be in .JPG format.
Important: Please Do Not Use Animated GIFS or Flashing or Moving Images in your profile or anywhere on the Service. Flashing images can cause some people headaches, photosensitive epilepsy, PSE or reflex epilepsy.
- Click the Camera Icon to search for an Image on your computer.
- Search for an Image to use for your Profile Photo.
- Click on the Image you want to Upload to your Profile. It will be highlighted.
- Click the “OPEN” button located in the bottom right-hand corner of your File Window. (PC) The Image will upload to your Profile. The File Window will close. You can also follow this step to change your Profile Photo Image.

Your Business Information
You can post the following business information in your Business Membership profile:
- Business Phone Numbers
- Business Street or Mailing Addresses
- Business Website URLs including related E-commerce Websites
- Business Email Addresses
- Business Advertising and Promotional Copy
Important: You will need an Individual Membership to enter or chat in Member Destinations. Business promotion and advertising is PROHIBITED in Member Destinations and includes business promotion and advertising in Personal Membership Profiles.
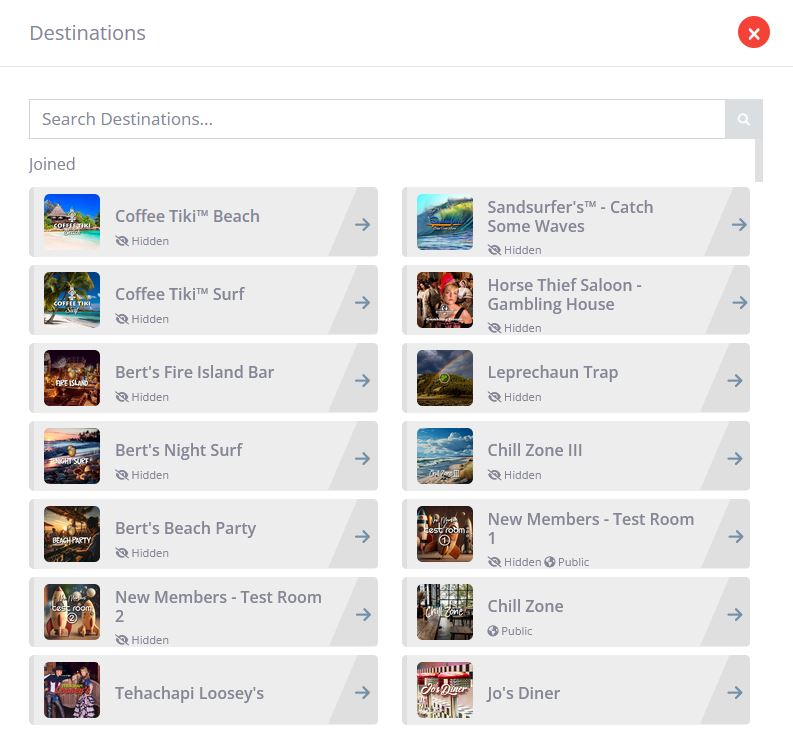
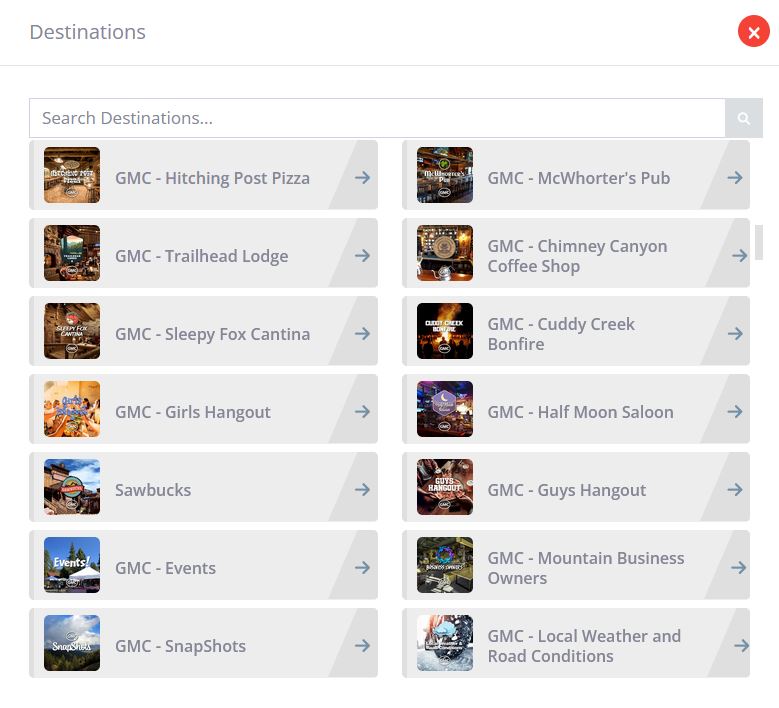
Your Destinations - List
- Click the “My Destinations” icon to view a List of Destinations you have Joined.
- Click on a “Destination Label” to visit the Destination.
- You can access your Destinations list inside any Destination by clicking the “My Destinations” icon located in the upper portion of the Left Panel or by clicking your “Username” located at the bottom of the Left Panel and then Clicking the “My Destinations” icon.
Sign Out
Click the “Sign Out” link when you are ready to leave the Head Chatter Website.
Your Username
There are three (3) main ways to identify yourself on Head Chatter. You can use your real name, or part of your real name, or a unique name up to 20 characters. Examples:
- SandyJones
- SandyBeach
- SandInPants
Username Choices
Consider choosing a name that reflects your personality or something you love or a creative name or a humorous one or something off the wall.
Make sure the Username you choose is not of a sexual nature, obscene or intentionally offensive, does not impersonate any “real” person and is not a business name unless you have a Store Front, Office Front, or Service Front Business Membership.
Username Change – Request a New Username
Be sure you choose a Username that you really like when you create your account because it cannot be changed by you.
If you make a typographical error or need a new Username for some reason, you can contact us with the correct spelling of the Username you chose and we will correct the error or provide you with a new Username.
Username and Deactivated Accounts
If you cancel your Membership, your Username will be unusable and your account will be deactivated. If you become a Member again in the future, your Username may not be available.
Your Profile
You have the option to upload a photo or image to your profile and provide information about yourself or leave parts of your profile blank.
It’s important to observe the following guidelines if you decide to upload a photo, icon, or image to your profile or provide any personal information.
Your Profile Photo
Your profile photo can be of you or any image as long as it is not an image of a sexual nature, violent, intentionally offensive, copyright protected, or obscene and meets our Community Guidelines.
Your Profile Photo or Image must be in .JPG format.
Important: Please Do Not Use Animated GIFS or Flashing or Moving Images in your profile or anywhere on the Service. Flashing images can cause some people headaches, photosensitive epilepsy, PSE or reflex epilepsy.
- Click the Camera Icon to search for an Image on your computer.
- Search for an Image to use for your Profile Photo.
- Click on the Image you want to Upload to your Profile. It will be highlighted.
- Click the “OPEN” button located in the bottom right-hand corner of your File Window. (PC) The Image will upload to your Profile. The File Window will close. You can also follow this step to change your Profile Photo Image.
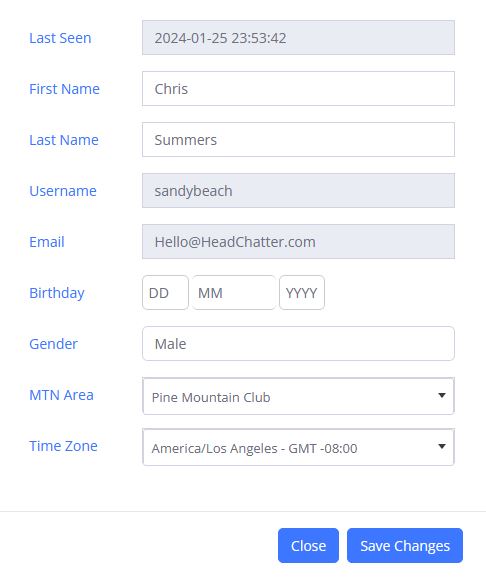
Your Personal Information – Individual Memberships
For your security and privacy, we recommend that you do not include phone numbers, street or mailing addresses, URLs, email addresses or any other personal contact information in your profile or in any publicly viewable areas on the Service.
- Your First Name and Last Name are NOT VISIBLE to Members.
- Your Username IS VISIBLE to Members.
- Your Email Address is NOT VISIBLE to Members.
- Your Birthday IS VISIBLE to Members. You can provide the date or leave it blank.
- Your Gender IS VISIBLE to Members if you provided your Gender when you created your account.
- The Mountain Area you choose IS VISIBLE to Members.
Your Business Information - For StoreFront, OfficeFront, and ServiceFront Business Memberships Only
If you own a business and would like to make it part of the Head Chatter Community, find out how you can Grow Your Business with a custom StoreFront, OfficeFront, or ServiceFront Destination here
Important: Business Memberships cannot be used to enter or chat in Member Destinations since business advertising and promotion is prohibited by members in Member Destinations.
Your Business Profile Photo
Your Business Profile photo can be of you, your logo, or any image as long as it is not an image of a sexual nature, violent, intentionally offensive, copyright protected, or obscene and meets our Community Guidelines.
Your Business Profile Photo or Image must be in .JPG format.
Important: Please Do Not Use Animated GIFS or Flashing or Moving Images in your profile or anywhere on the Service. Flashing images can cause some people headaches, photosensitive epilepsy, PSE or reflex epilepsy.
- Click the Camera Icon to search for an Image on your computer.
- Search for an Image to use for your Profile Photo.
- Click on the Image you want to Upload to your Profile. It will be highlighted.
- Click the “OPEN” button located in the bottom right-hand corner of your File Window. (PC) The Image will upload to your Profile. The File Window will close. You can also follow this step to change your Profile Photo Image.
Your Business Information
You can post the following business information in your Business Membership profile:
- Business Phone Numbers
- Business Street or Mailing Addresses
- Business Website URLs including related E-commerce Websites
- Business Email Addresses
- Business Advertising and Promotional Copy
Important: You will need an Individual Membership to enter or talk in Member Destinations. Business promotion and advertising is PROHIBITED in Member Destinations and includes business promotion and advertising in Personal Membership Profiles.
Membership Billing
Membership Credit Card/ACH Processor
Head Chatter uses Stripe, headquartered in San Francisco, California, and may use other reputable Credit Card and ACH Processors e.g. PayPal for your monthly membership when you use a credit card or electronic funds transfer for payment.

Cancel Your Account & Billing
Waiting Stripe InformationCredit Card/ACH Failed to Renew
Your credit card or ACH renewal may fail due to various reasons. The most likely reasons why a renewal fails are the following:
- Wrong payment information entered when creating a new Membership Account.
- Your Bank refuses to process your payment.
- Stripe or another payment processor is not accepting your payment method.
Stripe and other payment processors will not always know if the information you provide is correct. The payment processors communicate with your bank after the information you provide is submitted. Your bank will send a message back to the payment processor that the information entered is incorrect.
How to fix it: Click the “Create Account” link and submit your payment information again. You will not be double charged since the first transaction did not process.
The main reasons your bank may refuse to process your payment is due to your account being flagged for fraud or your account has insufficient funds to make the payment.
How to fix it: Contact your bank and ask a representative if the bank blocked any payments and the reason. Resolve any insufficient funds issues before trying to create a new account.
Stripe and other payment processors use proprietary filters that are built into their platforms that may block payments due to high risk and other attributes.
It is possible that the payment processor does not support certain cards that you used to create your Membership Account that caused the payment to fail or not process.
How to fix it: Try another credit card or bank account for ACH payments to create your Membership Account.
Change Your Billing Method
Waiting Stripe Information
Update Your Expired Credit Card Information
Waiting Stripe Information
Cost of Monthly Membership
Individual Auto-Renewing Monthly Membership
Your Individual Membership will automatically renew each month at the prevailing rate until you cancel your account.
Price: $19.95 Yearly
Business Auto-Renewing Monthly Membership
Your Business Membership will automatically renew each month at the prevailing rate until you cancel your account.
Price: $49.95 Monthly
Suggest a New Destination
Have an idea or a suggestion for a new Destination you think Members would enjoy, find useful or valuable? Let us know by Clicking the Link below.
Feedback
We use feedback to improve the Head Chatter experience for everyone. We’d love to hear yours. Tell us what do you think about Head Chatter. Did you run into any problems? Is there anything that you would like to see improved? Is there anything we can make easier? You are the best part of Head Chatter and we value your feedback.
Destination - Access
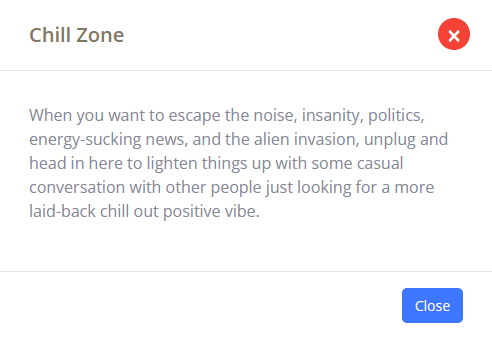
All Destinations except for By Request Destinations are open to everyone.
You will need to make a request to becoma a member of a By Request Destination. Let us know and we’ll send your request to the Member that manages the Destination and get back to you with a PIN code if the Group or Member accepts your request. You can request your own By Request Destination – more information here.
New Destinations and community areas and towns may be joining the Head Chatter family in the future. New community icons will appear in the Destination search area on the Home page.
Destination – Right Panel
Controls Menu
Click the “Controls” button to mute system sounds, report a problem, clear posts, and unjoin the Destination.
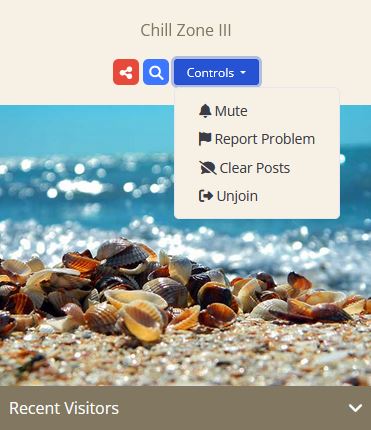
Select “Mute” to mute Destination sounds.
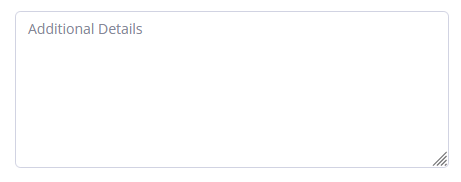
Select “Report Problem” to report a problem in the Destination. Cut & Paste the offending post or content into the “Additions Details” window.
Select “Clear Posts” to clear your view of all posts and content in the main post window.
Select “Unjoin Destination” to unjoin the Destination. The Destination name will be removed from your Destination List. You can rejoin the Destination again at anytime.
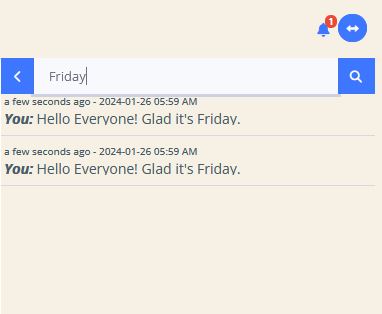
Search Conversations in Destinations

- Click the “Search Icon” to search conversations in the Destination by key word. Use only one (1) keyword per search. Your search results will appear below the search bar.
- Click on the Conversation. The Destination window will go to the post and flash.
- Click the “Left Arrow” to close the search bar and return to the Destination Left Panel.
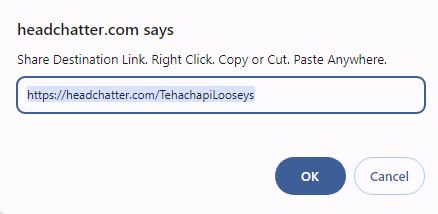
Share Destinations and the Head Chatter Website on Social Media, Messaging Apps, and by Email.

Click the Search Icon to open the Share Menu.
Click “Get Destination Link” if you would like to Cut and Paste the Destination address to share anywhere.
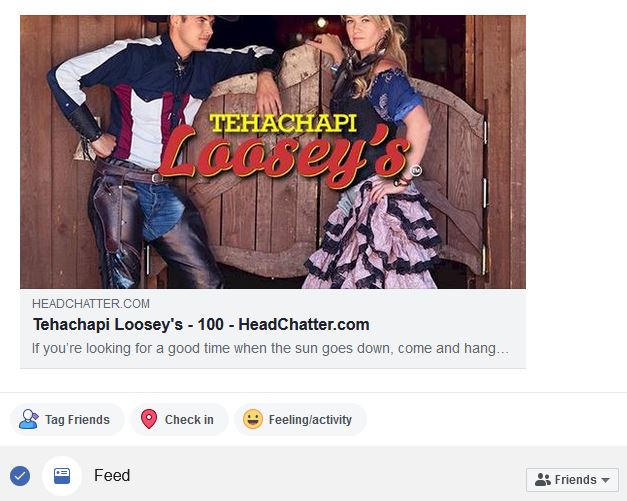
Share on Facebook
Click “Share on Facebook” if you would like to share a Destination address with your Facebook Friends and Family.
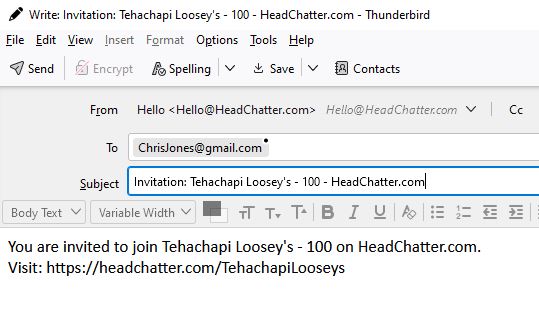
Share by Email
Click “Email Invitation” to open your email program to share the Destination link.
Share using Whatsapp
Click “Invite via WhatsApp” to open the WhatsApp link of your PC or other device.
Share using Telegram
Click “Invite via Telegram” if you would like to share a Destination address link to your Friends and Family using Telegram.

Thank you for Sharing!
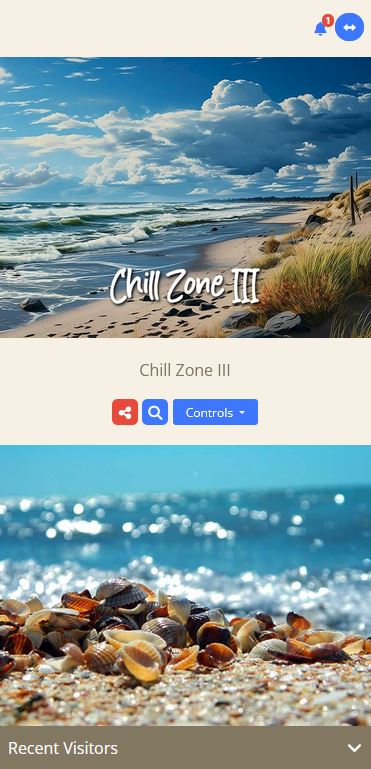
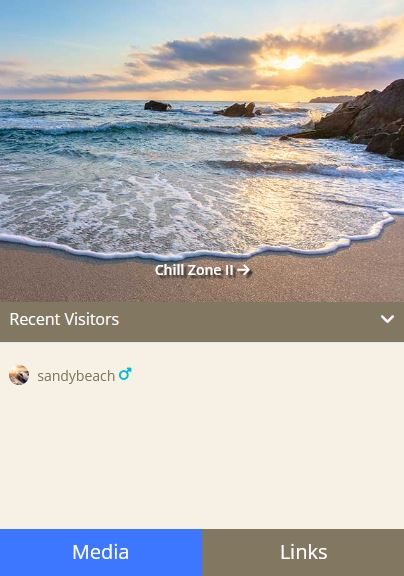
Recent Visitors
This area of the right panel shows a list of Members that have recently visited the Destination. You can send any Member in Recent Visitors list a Direct Message by clicking on their Username.
Media & Links Tabs
Media Tab
Use the Media Tab to see a list of photos and other media posted in the Destination.
- Click the “Media Tab” for a list of posts that include photos.
- Click on a Photo or other media thumbnail to open it in a slider gallery. Navigate the gallery using the left and right arrows.
- Share the Photo or media on social media by clicking the share icon.
- Click the [X] in the upper right-hand corner to close the gallery.
Links Tab
Use the Links Tab to see a list of Links posted in the Destination.
- Click the “Links Tab” for a list of posts that include links.
- If you click on a link, it will open a new browser window at the destination of the link.
View More Button
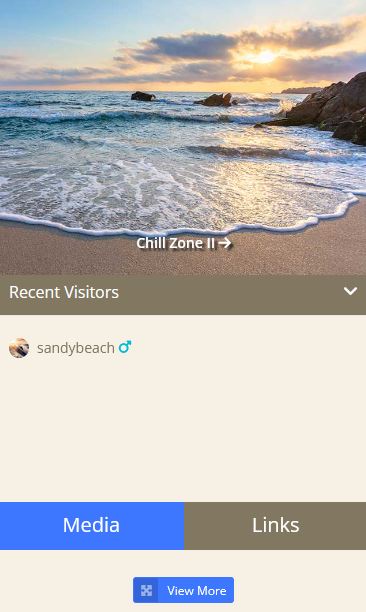
Click the “View More” button to view more Media or Links.
Load More Button
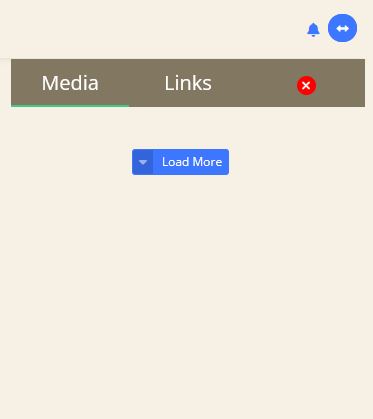
Click the “Load More” button to view more Media or Links.
Hide and Show Right Panel

Click the “Blue Double Arrow” in the upper right-hand Destination window to hide and show the right Destination panel.
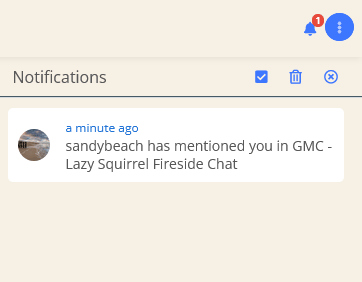
Notifications

When Members reply to your posts in a Destination using the @ symbol before your Screen Name e.g. “Hey @SandyBeaches! Pismo was awesome yesterday!”, you will receive notifications.
The number of notifications will appear in a circle on the top right of your notification bell.
Members will receive notifications when You reply to their posts using the @ symbol before their Screen Name e.g. “@SandyBeach, yeah, Pismo Beach is great!”.
- To View Notifications: Click the Notification Bell to view your notifications.
- To See the Reply: Click on a Notification to see the reply. You will be sent to the Destination where the reply was posted. It will flash twice.
- To Mark as Read: Click the Check icon to Mark All Notifications as Read.
- To Delete Notifications: Click on a Notification to Highlight it and then click the Trash Icon to Delete it.
- To Close Notifications: Click the X icon to close the Notifications Menu.
Right Panel Scroll Bar
The Right Panel scroll bar is located at the very edge on the panel in a light grey color on most browsers. You can “click and drag”the bar or “click” in the space above or below the bar to navigate up and down the panel.
Center Destination Window
Top Destination ID & Hashtag
The Destination ID and Hashtag are used internally for identification and navigation.

Hide & Show the Left Destination Panel
Click the left Blue Double Arrow to hide and show the left Destination Panel.

Top Drop-down Menu
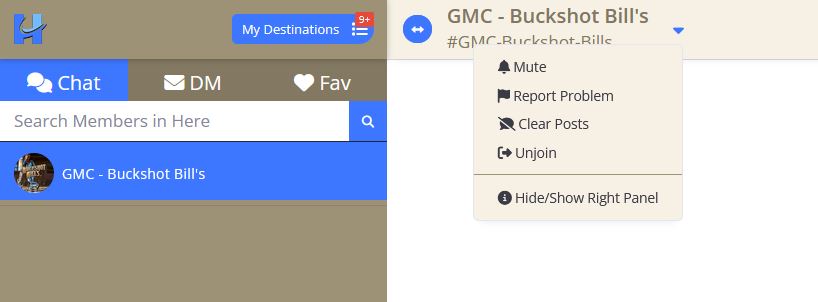
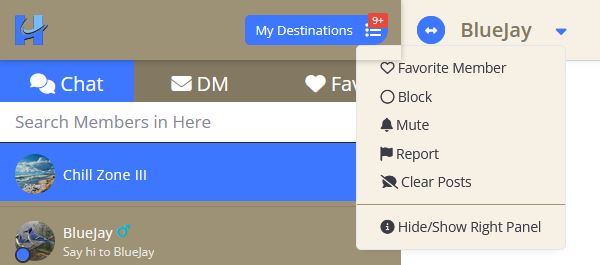
Mute Destination Sounds
System notification sounds can be turned Off and On using the “Mute” feature listed in the drop-down Menu.
- Click the small down-arrow on the left side of the Destination name to open the Menu.
- Click the “Mute” to turn sounds Off.
- To Un-Mute, click “Unmute” to turn sounds On.

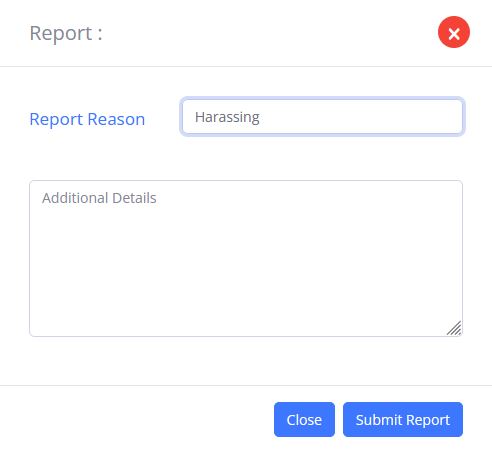
Report a Problem
- Click “Report” on the Menu to open a report form.
- Click inside the “Report Reason Bar” and Click a Reason for the Report.
- Provide Additional Details in the “Additional Details” Window. Please Cut & Paste the offending post or content that includes the Member’s Username into the “Additions Details” window.
- Click the “Submit Report” button to send.


Clear Posts
- Click the small down-arrow on the left side of the Destination name to open the Menu.
- Select “Clear Posts” to clear your view of all posts and content in the Center Chat window.
Unjoin Destination
- Click the small down-arrow on the left side of the Destination name to open the Menu.
- Select “Unjoin Destination” to unjoin the Destination.
Hide/Show Right Panel
- Click the small down-arrow on the left side of the Destination name to open the Menu.
- To Hide: Click “Hide/Show Right Panel”.
- To Show: Click the small down-arrow on the left side of the Destination name to open the Menu. Click “Hide/Show Right Panel”.
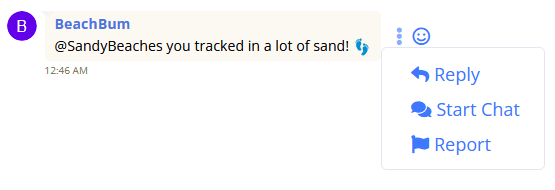
Member Posts
Reply to a Member’s Post
When a Member posts in a Destination, a vertical three-dot icon or “Kabob” will appear next to their Username. Clicking the Kabob will open a Menu that offers you three choices.
- Click the vertical three-dot icon or “Kabob” next to the Member’s post to open a Menu.
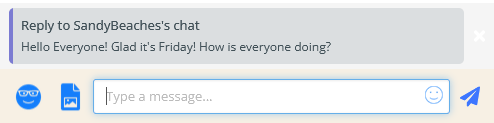
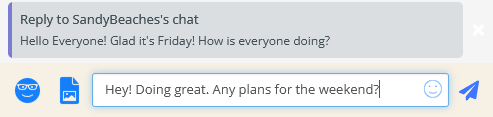
- Click “Reply” on the Menu. A copy of the Member’s post will appear above the Destination Message Bar.
- Type your message in the Message Bar and click the Paper Airplane icon to send your message.

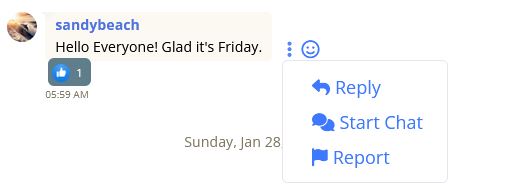
Report a Member's Post
- Click “Report” on the Menu to open a report form.
- Click inside the “Report Reason Bar” and Click a Reason for the Report.
- Provide Additional Details in the “Additional Details” Window. Please Cut & Paste the offending chat or content that includes the Member’s Username into the “ window.
- Click the “Submit Report” button to send.
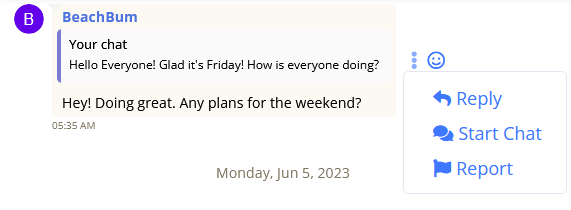
Important: Reports should be based on words, actions, or content that violates our Community Guidelines or Terms of Service.
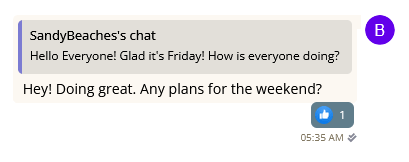
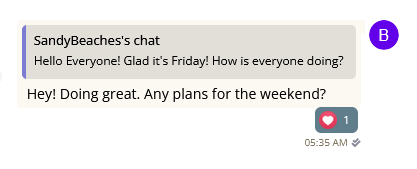
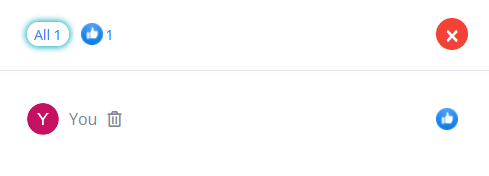
React to a Member’s Post
Like, Love, Care, Laugh, Wow, Sad, and Angry.
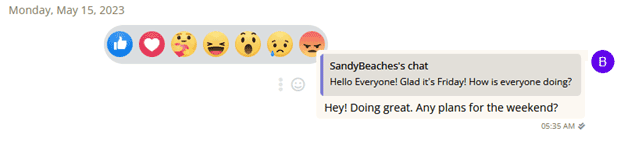
- Click the Smiley Icon next to the Member’s Post.
- Click on one of the Reaction Emojis to express your reaction.
- To Change your Reaction - Click the Smiley Icon next to the Member’s Post again and Click on one of the Reaction Emojis to express your reaction.
- To Delete your Reaction - Click on the reaction Emoji Tally Box and Click the Trash Can Icon.
The number of reactions is shown in Emoji Tally box.

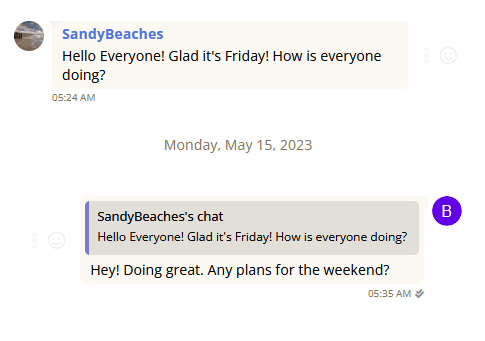
Direct Messenger – Member-to-Member Conversations
Start a Conversation Directly with a Member. Direct Message Windows look just like Destinations. The Member’s Profile Photo and their text may appear in the upper right area of the Right Panel.
- Click the vertical three-dot icon or “Kabob” next to the Member’s post.
- Click “Start Chat” to open a Direct Message with the Member. The Member will receive a Direct Message Alert. You can alert the Member in the Destination that you are both in, or wait for the Member to respond to your Message.
- After the Direct Message opens, type and send a message to the Member.
- To return to the Destination, Click the Blue “Chat” Bar located on the Left Destination Panel under the “Search Members in Here” Bar.
- To Return to your Direct Message with the Member, Click on the Member’s Username where it appears in the Destination or Click on the vertical three-dot icon or “Kabob” next to the Member’s post in the Destination and Click “Start Chat”.

Note: If the Member has signed out, they will receive an alert when they sign in that your Message is waiting to be read.

Report a Problem
- Click the small down-arrow on the right side of the “Destination Name” located at the top of the Direct Message Chat Window to open a Menu.
- Click “Report” on the Menu to open a report form.
- Click inside the “Report Reason Bar” and Click a Reason for the Report.
- Provide Additional Details in the “Additional Details” Window. Please Cut & Paste the offending chat or content that includes the Member’s Username into the “Additions Details” window.
- Click the “Submit Report” button to send.

Important: Reports should be based on words, actions, or content that violates our Community Guidelines or Terms of Service.
Menu Controls for Your Posts
Click on the vertical three-dot icon or “Kabob” next to your post to open the Menu.
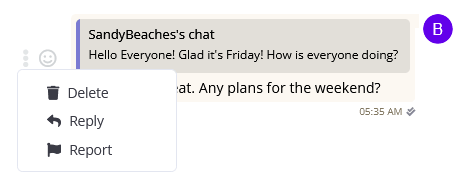
Delete Your Post
Click “Delete” on the Menu. Your Post will be deleted.

Reply to Your Post
- Click “Reply” on the Menu. This will create a copy of your post and place it above the Destination Message Bar for you to reply to it.
- Type your message and click the Blue Paper Airplane to send it.
- Click the Smile Icon to include an Emoticon with your message.
- Click the Photo Upload Icon to include a Photo or Image with your message.
- Click the Sticker Icon to send a Sticker without out a message.

Cancel the reply to your post by clicking the white X icon.


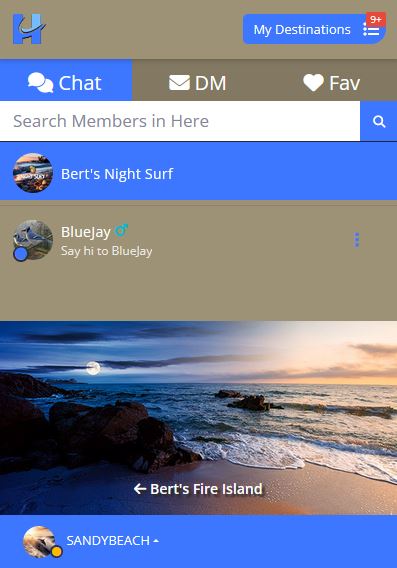
Destination Controls – Left Panel
Home Page Link
Click the “C” icon to return to the Home Page.
Your Destination List
Each Destination that you visit/join will be added to your “My Destinations” list.
You can view your list at sign-in and you can view your list in every Destination.
- Click the “My Destinations” icon to view a List of Destinations you have Joined.
- Click on a Destination Label to visit the Destination.

You can access your Destination List in every Destination and from the Home Page “Sign In” button after you Sign in.
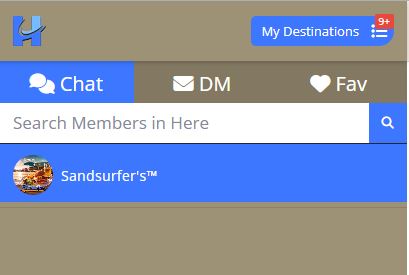
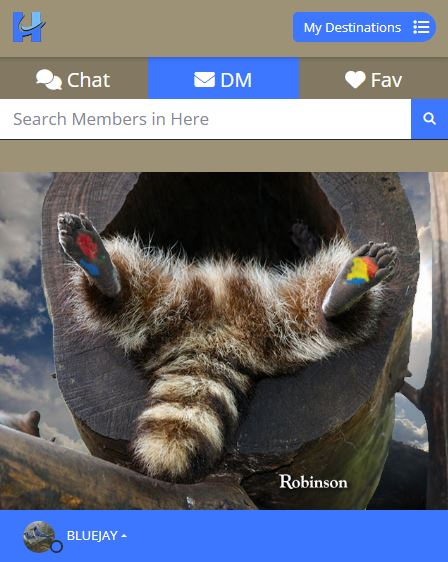
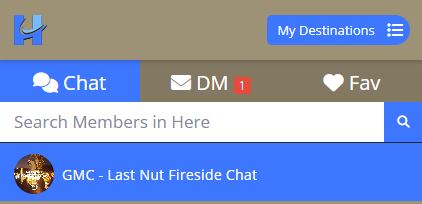
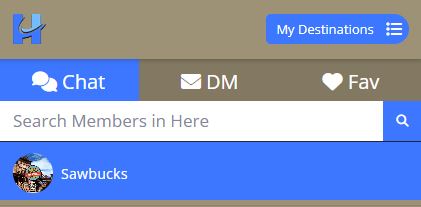
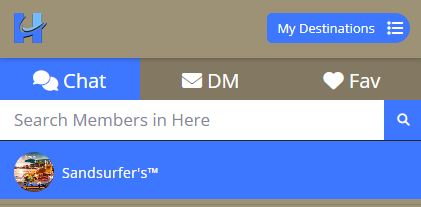
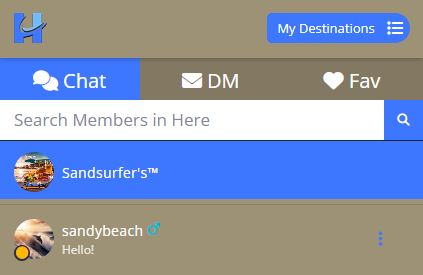
Chat Tab
The Chat tab provides a list of Members that have joined the Destination and will show their color-coded online status – Online, Offline, Busy or Away.
Click the blue “Chat” tab to see a list of Members that have visited the Destination.
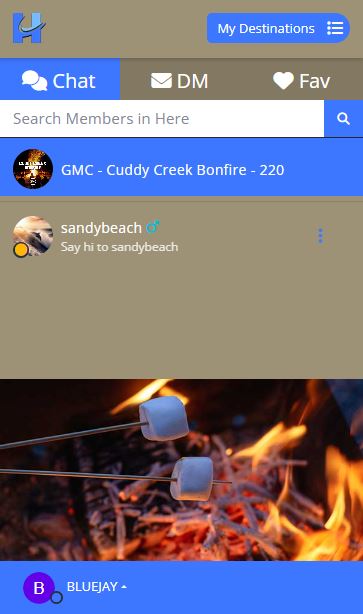
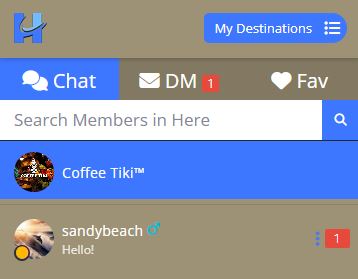
DM Tab – Direct Messenger
- Click the DM “Direct Message” Tab to see a list of Members you have sent Direct Messages to in the past.
- Click the Screen Name of a Member to see New Messages.
- Click the Screen Name of a Member to send the Member a new Direct Message.
A Red Box will appear on the DM tab indicating the total number of unanswered Messages you have received from Members.
A Red Box appearing after Member’s Screen Name on your Destination Member list indicates a New Message from that Member.
Navigation Tip: Click the “Chat” tab and then the blue highlighted “Destination Name Bar” on the Left Panel to navigate between a Direct Message and the Destination you are presently visiting.
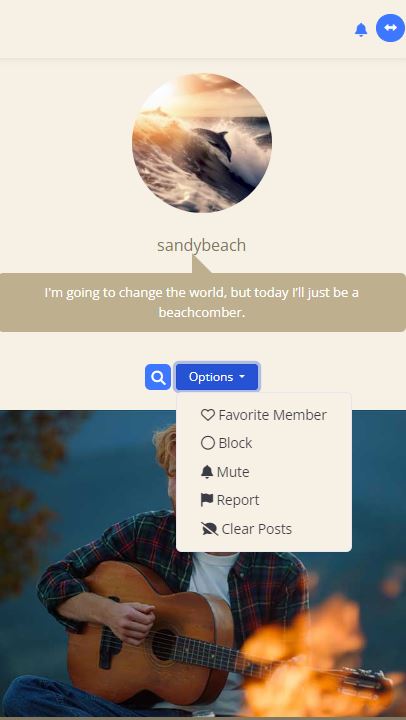
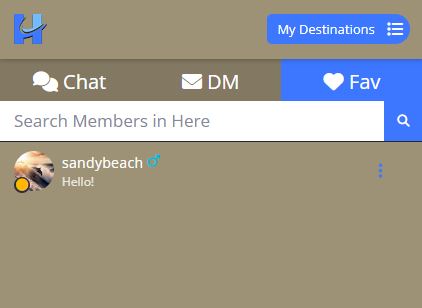
Fav Tab – Favorite Members
You can create a Favorite Members list in each Destination you join.
You can Favorite Members only during Direct Message conversations with them by clicking the “Options” button on Right Panel and clicking “Favorite Member”.
This will add the Member to your Favorites list in the Destination in which you sent the Member a DM – Direct Message.
- Click the “Fav” Tab to see a list of the Favorite Members in a Destination.
- Click the Member’s Username to open a Direct Message.
Navigation Tip: Click the “Chat” tab and then the blue highlighted “Destination Name Bar” on the Left Panel to navigate between a Direct Message and the Destination.
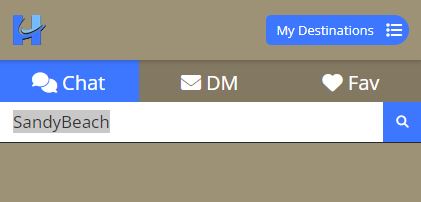
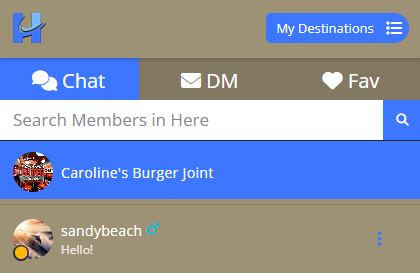
Search for Members in Here
- Enter a Member’s Screen Name in the “Search Members” bar and click the search icon.
- Click a Member’s Screen Name to open a Direct Message.
Tip: If the Member is in the Destination their Username will appear below the search bar.
Tip: Click the “Room” tab and then the blue highlighted “Destination Name Bar” on the Left Panel to navigate between a Direct Message with a Member and the Destination.
View a Member’s Profile
-
Click on a “Member’s Username” to view their Profile.
You can send the Member a Message or go back to the Destination by clicking the blue highlighted “Destination Name Bar” on the Left Panel.
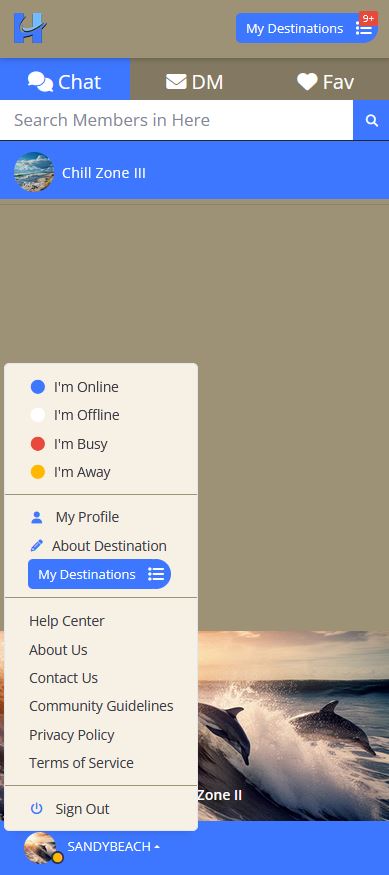
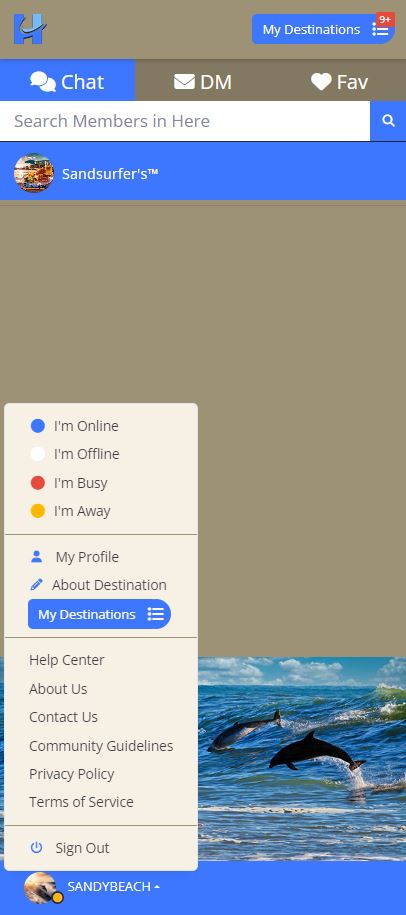
Your Account Menu
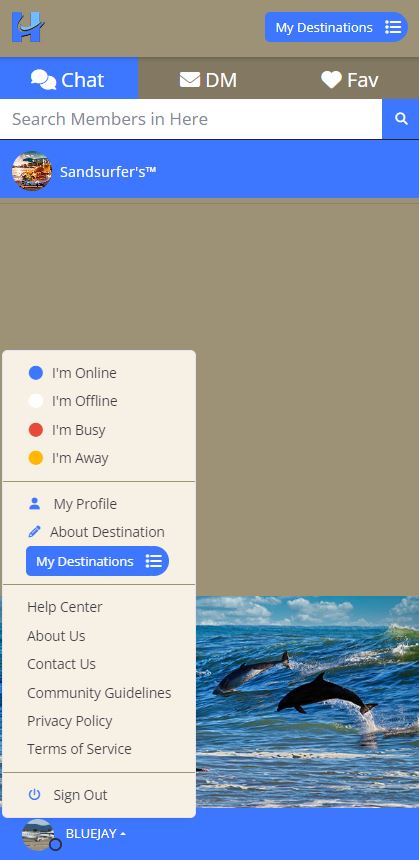
Your Online Status
Tell Members when you are Online, Offline, Busy, and Away.
- Click the “Up Arrow” next to your Screen Name to open your Account Menu.
- Click on the “Online Status” you want Members to see.
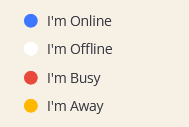
Your Account Menu will automatically close after you select your Online Status.
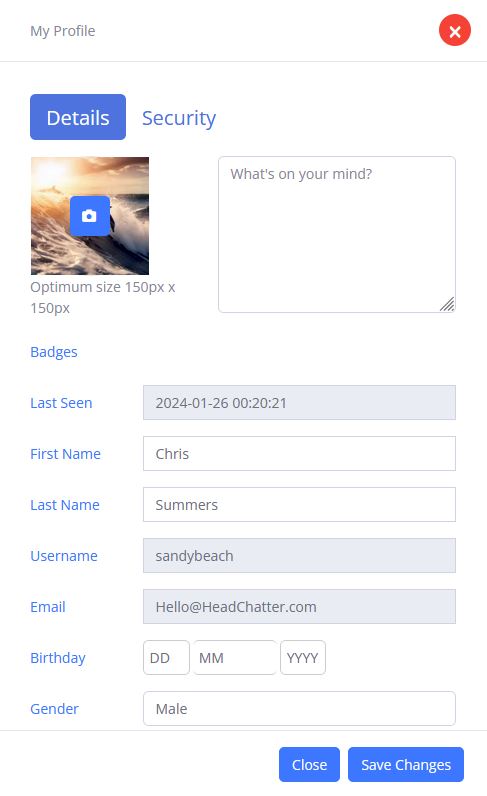
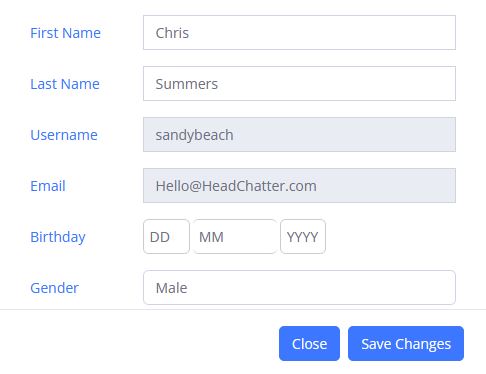
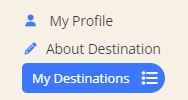
Your Profile
View and make changes to your Profile.
- Click the small “Up Arrow” next to your Username to open your Account Menu.
- Click on “My Profile” on your Account Menu and Click “Details” to view and make changes to your Profile.
- Click on the “Camera Icon” to change your profile photo. This will open a folder on your computer to locate and select a new photo or image for your profile.
- Highlight the photo or image you want to use for your profile photo and click “Open”. The photo or image you selected will automatically be uploaded to your profile.

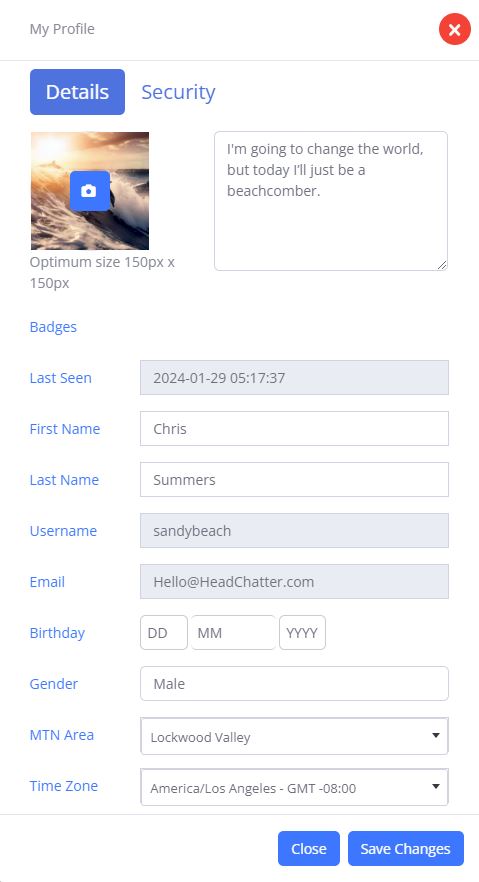
Click inside the Message Area to change or edit your Profile Message.

Your first and last name is NOT visible to Members.
Your Username and Email Address can only be changed by request. To request a new Username or Email address change, click the “Contact Us” Link in your Account Menu and let us know.
You can enter your Birthday or leave it blank. Your Birthday is visible to Members

You can indicate your gender as Male, Female, or Other.


Let Members know what area of the Mountain you are located in. Click the down arrow and select an area.


About Destination
- Click “About Destination” on your Account Menu to read the description of the Destination.
My Destinations
Click the “My Destinations” on your Account Menu to view the Destinations you have joined.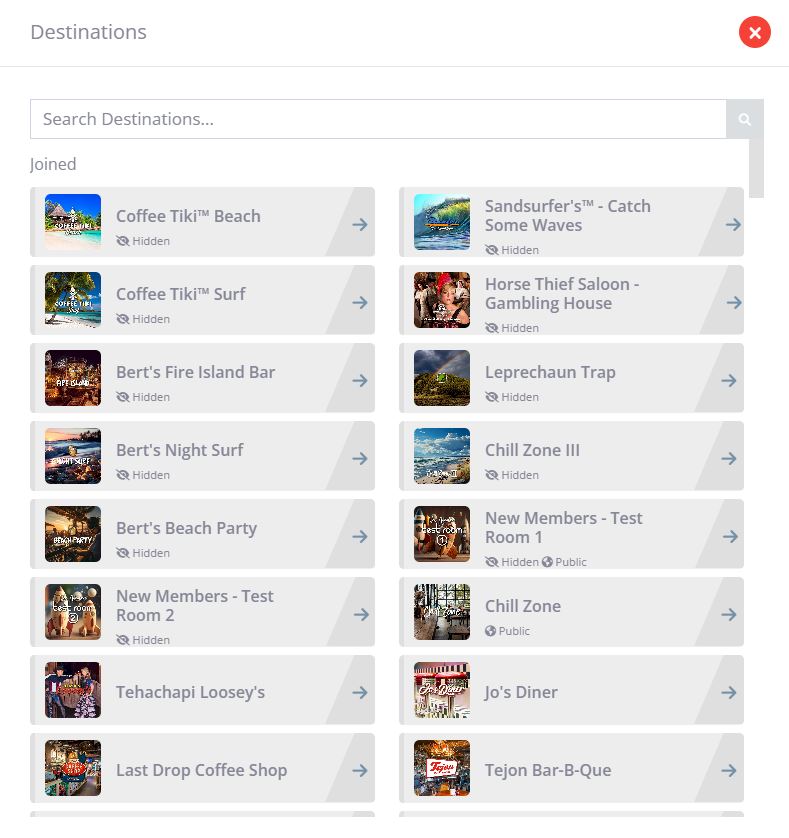
Help Center
Click the “Help Center” link on your Account Menu for quick answers to common questions.About Us
Click the “About Us” link on your Account Menu to learn more about Head Chatter.Contact Us
Got a question? Want to provide some feedback? Need some help? Something else? Click the “Contact Us” link on your Account Menu and send us a message or send us an email at: Hello@HeadChatter.comCommunity Guidelines
Click “Community Guidelines” on your Account Menu to read the guidelines we created so every Member can enjoy a great chat and experience and to help ensure that every Member can participate in conversations freely.Privacy Policy
Click “Privacy Policy” on your Account Menu to read the most recent Head Chatter Privacy Policy and the Privacy Policy Supplement Applicable to Residents of California.Terms of Service
Click “Terms of Service” on your Account Menu to read the most recent Head Chatter Terms of Service.Sign Out
Click the “Sign Out” link on your Account Menu when you are ready to leave the Head Chatter Website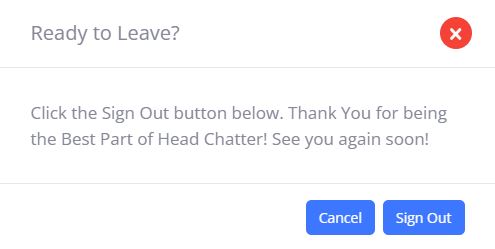
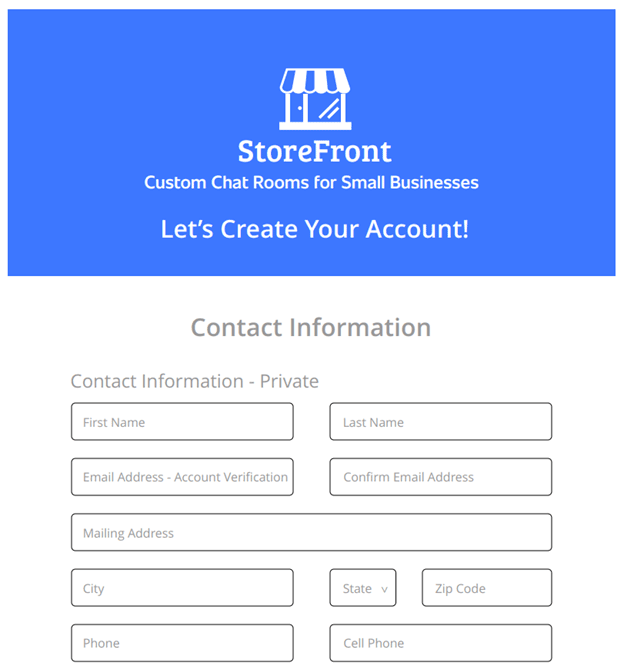
Custom Destinations for Your Business
StoreFront • OfficeFront • ServiceFront

Create Your Business Membership Account - Step 1
- Click on the “Grow Your Business” link located on the bottom portion of the Home Page.
- Decide which type of Custom Business Destination fits your business and Click the “Get Started” button.
- On the Get Started Page, Click “Create Account”.
- Complete the “Create Account” form and submit.
- Click the “Account Activation” link provided in the Account Activation email.

An “Account Activation” email will be sent to you at the email address you provided on the form. Be sure your Spam controls allow email from AccountActivation@HeadChatter.com
Clicking this link will activate your Account and open a page where you can provide details about your business, photos, a digital logo, and other digital branding and promotional materials. This information will be used to create your Custom Business Destination.
If you have questions or need help along the way, we’re available by email and phone to assist you.
Important: Business Memberships cannot be used to enter or talk in Member Destinations since business advertising and promotion is prohibited by members in Member Destinations. In order to talk in Member Destinations, you will need an Individual Membership account.
Your Business Membership Profile Photo
Your Business Profile photo can be of you, your logo, or any image as long as it is not an image of a sexual nature, violent, intentionally offensive, copyright protected, or obscene and meets our Community Guidelines.
Your Business Profile Photo or Image must be in .JPG format.
Important: Please Do Not Use Animated GIFS or Flashing or Moving Images in your profile or anywhere on the Service. Flashing images can cause some people headaches, photosensitive epilepsy, PSE or reflex epilepsy.
- Click the Camera Icon to search for an Image on your computer.
- Locate an Image you would like to use for your Profile Photo.
- Click on the Image to highlight it.
- Click the “OPEN” button located in the bottom right-hand corner of your File Window. (PC or Mac) The Image will upload to your Profile. The File Window will close. You can also follow this step to change your Profile Photo Image.
Your Business Membership Profile Information
You can post the following business information in your Business Membership profile:
- Business Contact Information
- Business Phone Numbers
- Business Street or Mailing Addresses
- Business Website URLs including related E-commerce Websites
- Business Email Addresses
- Business Advertising and Promotional Copy
- Business Credentials and License Numbers
Business Destination Details, Information, and Content – Step 2
Provide Your Business Destination Details, Information, and Content. Click below.
[Details]
Important: Make sure you create your Business Membership Account before submitting your Destination Business details.
Make Business Destination Changes
Click the Email button below to make changes or provide updates to your Business Description, Content, Main Photo, Panel text, Panel Photos, and Website links.
Important: Photos and Images must be in .JPG format. Be sure to indicate the Destination area for the changes e.g. Right Panel, Left Panel, Main Business Thumbnail Photo, Business Description, etc.
If you have any questions or need help along the way, we’re available by Contact Form, Email and by Phone to assist you.
By Request Destinations
By Request Custom Destinations may be created for Groups, Clubs, Organizations, Families, Special Interest Groups and Employee Groups with Members of 4 or more people who are Members of Head Chatter.
- Destinations Require a PIN Code to Enter
- Requester Serves as the Destination Leader and Point of Contact
- All Members must have a Head Chatter Membership Account
- Four or more Head Chatter Members are Required
- Based on Time, Availability, and Resources
- Head Chatter Terms of Service and Community Guidelines Apply
Get started by making a request today!
[Request]
(Need a simple By Request form)Home Page
Sign In
- Click the “Sign In” button.
- Enter your Username and Password and Click “Sign In”.
Forgot Your Password?
- Click the “Forgot Password” link if you forgot your password or the one you entered is wrong.
- Enter your Email address and Click the “Reset Password” button.
- Check your Email for a Password Reset Link
- Click the “Reset Password” Button in the Email
- Enter Your New Password and Click the “Reset Password” Button
- Click the “Sign-In” link to sign into your Account using your New Password
Note: The email address you enter to reset your password must match the email address you used to create your account.
SPAM Controls: If you don’t see the “Password Reset” email we sent to you within a few minutes, please check your junk/spam folder.
Having Trouble? If you encounter Sign-In problems or have trouble resetting your password, contact us for help by clicking the “Contact Us” link Here.
Sign-In Menu
Your Profile
You have the option to upload a photo or image to your profile and provide information about yourself or leave parts of your profile blank.
It’s important to observe the following guidelines if you decide to upload a photo, icon, or image to your profile or provide any personal information.
Your Profile Photo
Your profile photo can be of you or any image as long as it is not an image of a sexual nature, violent, intentionally offensive, copyright protected, or obscene and meets our Community Guidelines.
Your Profile Photo or Image must be in .JPG format.
Important: Please Do Not Use Animated GIFS or Flashing or Moving Images in your profile or anywhere on the Service. Flashing images can cause some people headaches, photosensitive epilepsy, PSE or reflex epilepsy.
- Click the Camera Icon to search for an Image on your computer
- Search for an Image to use for your Profile Photo.
- Click on the Image you want to Upload to your Profile. It will be highlighted.
- Click the “OPEN” button located in the bottom right-hand corner of your File Window. (PC) The Image will upload to your Profile. The File Window will close. You can also follow this step to change your Profile Photo Image.
Your Personal Information – Individual Memberships
For your security and privacy, we recommend that you do not include phone numbers, street or mailing addresses, URLs, email addresses or any other personal contact information in your profile or in any publicly viewable areas on the Service.
- Your First Name and Last Name are NOT VISIBLE to Members.
- Your Username IS VISIBLE to Members.
- Your Email Address is NOT VISIBLE to Members.
- Your Birthday IS VISIBLE to Members. You can provide the date or leave it blank.
- Your Gender IS VISIBLE to Members if you provided your Gender when you created your account.
- The Area you choose IS VISIBLE to Members.
StoreFront, OfficeFront, or Service Front Business Memberships
If you own a business and would like to make it part of the Head Chatter Community, find out how you can Grow Your Business with a custom StoreFront, OfficeFront, or ServiceFront here.
Important: Business Memberships cannot be used to enter or chat in Member Destinations since business advertising and promotion of any kind by members is prohibited in Member Destinations.
Your Business Profile Photo
Your Business Profile photo can be of you, your logo, or any image as long as it is not an image of a sexual nature, violent, intentionally offensive, copyright protected, or obscene and meets our Community Guidelines.
Your Business Profile Photo or Image must be in .JPG format.
Important: Please Do Not Use Animated GIFS or Flashing or Moving Images in your profile or anywhere on the Service. Flashing images can cause some people headaches, photosensitive epilepsy, PSE or reflex epilepsy.
- Click the Camera Icon to search for an Image on your computer.
- Search for an Image to use for your Profile Photo.
- Click on the Image you want to Upload to your Profile. It will be highlighted.
- Click the “OPEN” button located in the bottom right-hand corner of your File Window. (PC) The Image will upload to your Profile. The File Window will close. You can also follow this step to change your Profile Photo Image.
Your Business Information
You can post the following business information in your Business Membership profile:
- Business Phone Numbers
- Business Street or Mailing Addresses
- Business Website URLs including related E-commerce Websites
- Business Email Addresses
- Business Advertising and Promotional Copy
Important: You will need an Individual Membership to enter or chat in Member Destinations. Business promotion and advertising is prohibited by members in Member Destinations and includes business promotion and advertising in Personal Membership Profiles.
My Destinations - List
- Click the “My Destinations” icon to view a List of Destinations you have Joined.
- Click on a Destination Label to visit the Destination.
- You can access your Destinations List inside any Destination by clicking the “My Destinations” icon located in the upper portion of the Left Panel or by clicking your “Username” located at the bottom of the Left Panel and then Clicking the “My Destinations” icon.
Sign Out
Click the “Sign Out” link when you are ready to leave the Head Chatter Website.
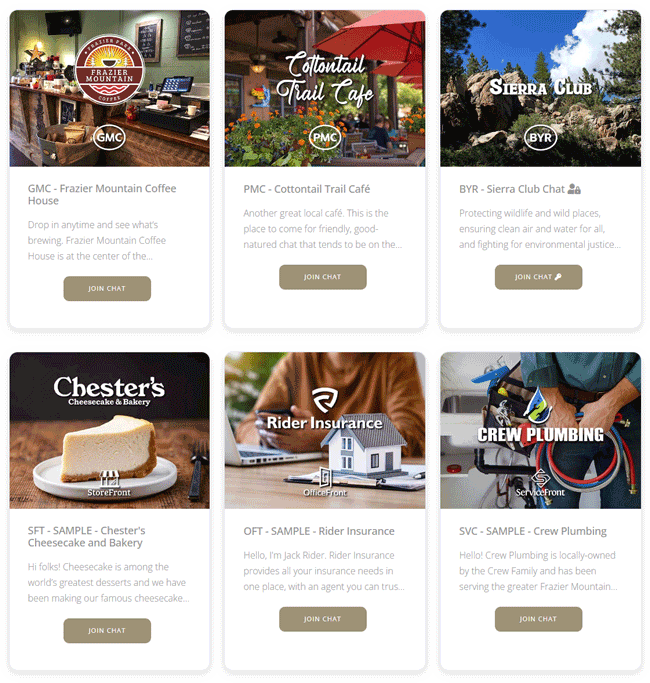
Search for Destinations Bar

Search for a Destination by name e.g. “Jo’s Diner” or a Business by Type e.g. “Plumbing”. Type a word and Click the search icon.
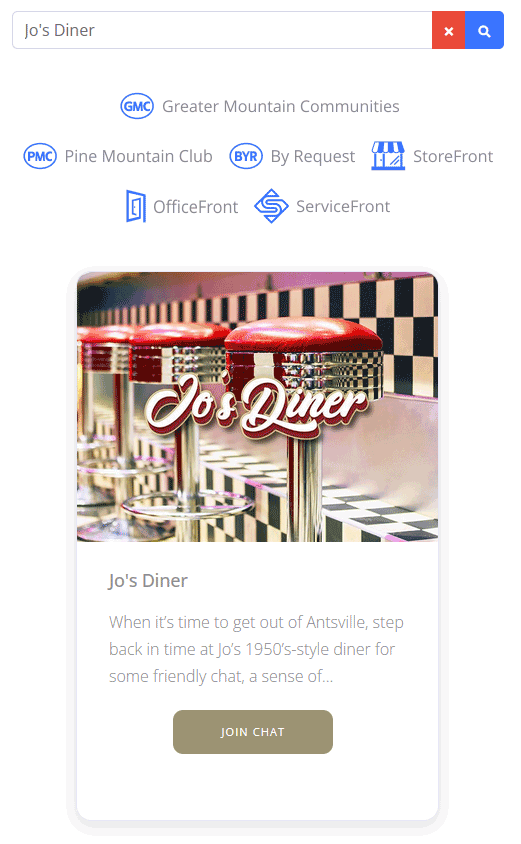
Search for Destinations by Community, By Request or by Business Type
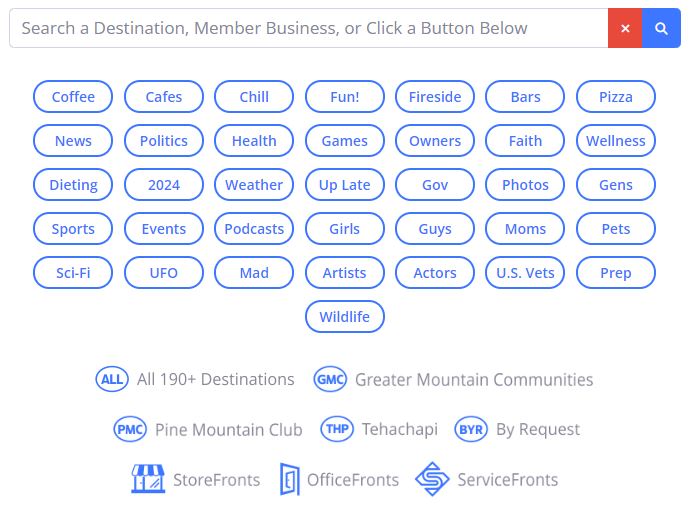
Click an Icon to perform a search.
Need More Help?
Get help, answers to questions, and support by clicking the link below. We'll get back to you soon.